1. Windows Store apps made easy with Prism and Prism project templates
2. Views, ViewModels and navigation
3. Configuring Prism using Unity or Ninject

Manual registration of ViewModels with ViewModelLocator is dull and error prone – you can always forget to register new class or copy-paste incorrect definition.

Fortunately, the configuration process can be automated by using dependency injection container, for example Unity or Ninject.

Setting up Unity

When you are starting a new app, you have an option to create a fully configured Unity-based Prism app. My demo was created using the blank Prism app template and I am going to modify the code to introduce Unity.

First, use NuGet to add Unity to the project, create an instance of UnityContainer in App class.
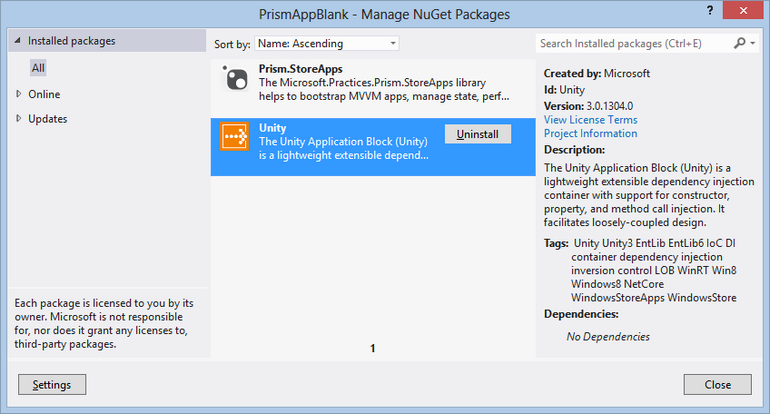
NuGet Unity


private readonly IUnityContainer _container = new UnityContainer();

Than you can modify OnInitialize() method to register NavigationService in Unity container and override Resolve() function to link Unity with Prism framework.


using Microsoft.Practices.Prism.StoreApps;
using Microsoft.Practices.Unity;
using System;
using Windows.ApplicationModel.Activation;

namespace PrismUnityApp
{
    sealed partial class App : MvvmAppBase
    {
        private readonly IUnityContainer _container = new UnityContainer();

        public App()
        {
            this.InitializeComponent();
        }

        protected override void OnLaunchApplication(LaunchActivatedEventArgs args)
        {
            NavigationService.Navigate("Main", null);
        }

        protected override void OnInitialize(IActivatedEventArgs args)
        {
            _container.RegisterInstance(NavigationService);
        }

        protected override object Resolve(Type type)
        {
            return _container.Resolve(type);
        }
    }
}

That is it. From now on Unity will take care about ViewModels resolution and creation. New pages will not require configuration changes.

Setting up Ninject

To use Prism with Ninject you need the same steps as in case of Unity – add Ninject package, register NavigationService and link container with Prism type resolver.
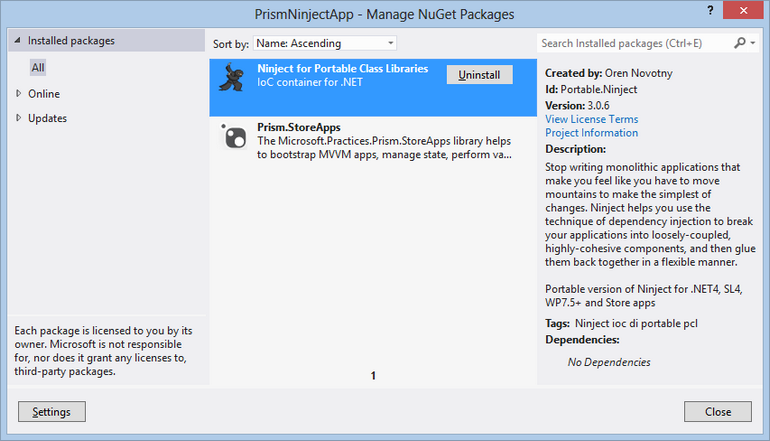
NuGet Ninject


using Microsoft.Practices.Prism.StoreApps;
using Microsoft.Practices.Prism.StoreApps.Interfaces;
using Ninject;
using Windows.ApplicationModel.Activation;

namespace PrismNinjectApp
{
    sealed partial class App : MvvmAppBase
    {
        private IKernel _ninjectKernel = new StandardKernel(); 

        public App()
        {
            this.InitializeComponent();
        }

        protected override void OnLaunchApplication(LaunchActivatedEventArgs args)
        {
            NavigationService.Navigate("Main", null);
        }

        protected override void OnInitialize(IActivatedEventArgs args)
        {
            _ninjectKernel.Bind().ToConstant(NavigationService);
        }

        protected override object Resolve(System.Type type)
        {
            return _ninjectKernel.Get(type);
        }
    }
}
Prism for Windows Store: Views, ViewModels and navigation

1. Windows Store apps made easy with Prism and Prism project templates
2. Views, ViewModels and navigation

Previously described application is unrealistically simple. In reality, your apps will include more than one page and you will need some navigation mechanism to help users to browse between these pages.

Adding new pages

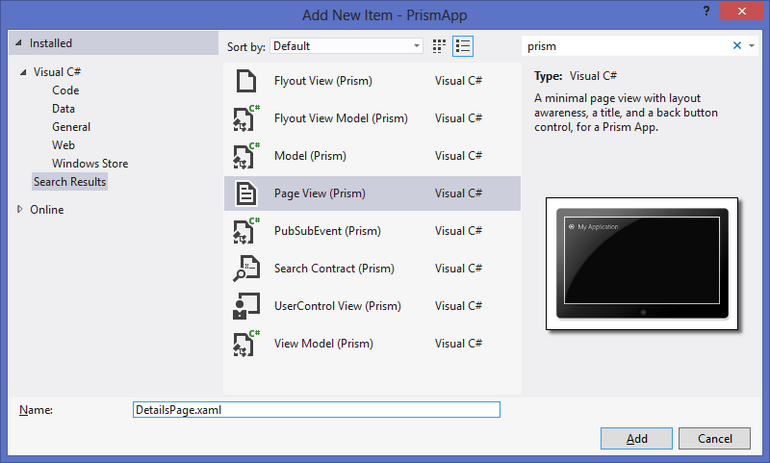
In addition to the project templates, Prism extension provides several item templates – Page View, View Model, Model and others.

Extensions and Updates

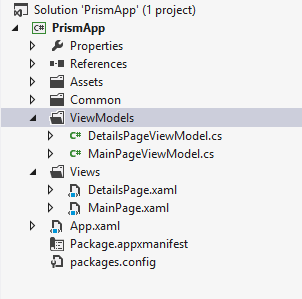
Use “Add New Item” dialog to add new Page View and View Model to Views and ViewModels folders correspondingly. Name them DetailsPage and DetailsPageViewModel.

Extensions and Updates

Next step is to set new DetailsPageViewModel as a data context for the DetailsPage. You can setup context manually, but Prism provides a handy ViewModelLocator class to do it semi-automatically. Why not fully automatically? Because you still need to setup ViewModelLocator.AutoWireViewModel property for DetailsPage.


<prism:VisualStateAwarePage 
    x:Name="pageRoot"
    x:Class="PrismApp.ViewModels.DetailsPage"
    xmlns="http://schemas.microsoft.com/winfx/2006/xaml/presentation"
    xmlns:x="http://schemas.microsoft.com/winfx/2006/xaml"
    xmlns:local="using:PrismApp.ViewModels"
    xmlns:d="http://schemas.microsoft.com/expression/blend/2008"
    xmlns:mc="http://schemas.openxmlformats.org/markup-compatibility/2006"
    xmlns:prism="using:Microsoft.Practices.Prism.StoreApps"
    mc:Ignorable="d"
    prism:ViewModelLocator.AutoWireViewModel="True">
    
    ...

</prism:VisualStateAwarePage>

How it works

For wiring Pages with ViewModels Prism framework uses a convention over configuration approach. Class names as well as Views and ViewModels folders are parts of this convention.

By setting AutoWireViewModel for DetailsPage to true we instruct ViewModelLocator to search DetailsPageViewModel in ViewModels folder. If such class is found, Prism will construct it and use as a data context for the DetailsPage.

Sounds logical, but let us look at the DetailsPageViewModel code.


using Microsoft.Practices.Prism.StoreApps;
using Microsoft.Practices.Prism.StoreApps.Interfaces;

namespace PrismApp.ViewModels
{
    public class DetailsPageViewModel : ViewModel
    {
        private INavigationService _navigationService;

        public DetailsPageViewModel(INavigationService navigationService)
        {
            _navigationService = navigationService;
        }
    }
}

The class does not have default parameterless constructor, will Prism be able to construct the object? Actually no: if you will try to run the code as it is, ViewModelLocator will throw an exception telling us that an appropriate constructor was not found.

As you may expect, there is a way to instruct Prism which constructor to use. We can override App. OnInitialize method and properly configure ViewModelLocator.


using Microsoft.Practices.Prism.StoreApps;
using PrismApp.ViewModels;
using PrismApp.Views;
using Windows.ApplicationModel.Activation;

namespace PrismApp
{
    sealed partial class App : MvvmAppBase
    {
        public App()
        {
            InitializeComponent();
        }

        protected override void OnLaunchApplication(LaunchActivatedEventArgs args)
        {
            NavigationService.Navigate("Main", null);
        }

        protected override void OnInitialize(IActivatedEventArgs args)
        {
            ViewModelLocator.Register(typeof(MainPage).ToString(), 
                                      () => new MainPageViewModel(NavigationService));
            ViewModelLocator.Register(typeof(DetailsPage).ToString(), 
                                      () => new DetailsPageViewModel(NavigationService));
        }
    }
}

Navigation

With the object provided in constructor and implementing INavigationService interface, navigation is easy.


using Microsoft.Practices.Prism.StoreApps;
using Microsoft.Practices.Prism.StoreApps.Interfaces;

namespace PrismApp.ViewModels
{
    public class MainPageViewModel : ViewModel
    {
        private INavigationService _navigationService;

        public MainPageViewModel(INavigationService navigationService)
        {
            _navigationService = navigationService;
        }

        public void GoToDetails()
        {
            _navigationService.Navigate("Details", null);
        }

        ...
    }
}

Navigation service use the same Views/ViewModels convention as ViewModelLocator. First parameter in Navigate() function defines target page name, service constructs full class name by adding “Page” suffix. Second parameter allows you to pass some data to the next page.

This concludes Prism Views and ViewModels discussion. Next post will talk about additional configuration techniques.

Windows Store apps made easy with Prism and Prism project templates

Prism library from Microsoft patterns & practices team is well known among WPF and Silverlight developers. It provides guidance for developing maintainable client software, helps with MVVM pattern implementation and facilitates good design practices, such as separation of concerns and loose coupling.

Recently, P&P team presented a version of Prism for Windows Runtime. This version of Prism is mainly focused on MVVM, navigation and app lifecycle management. Optimized for WinRT, it also supports such Windows 8-specific features as setting and search flyouts.

The following steps will help you to start Windows Store app development using Prism library.

Where to get started

Prism for Windows Runtime is available as a NuGet package (Prism.StoreApps), but there is a simpler approach for starting - use Prism project templates. Prism project templates is a separate product developed as by a third-party developer and distributed as a VisualStudio extension.

Install Prism project templates

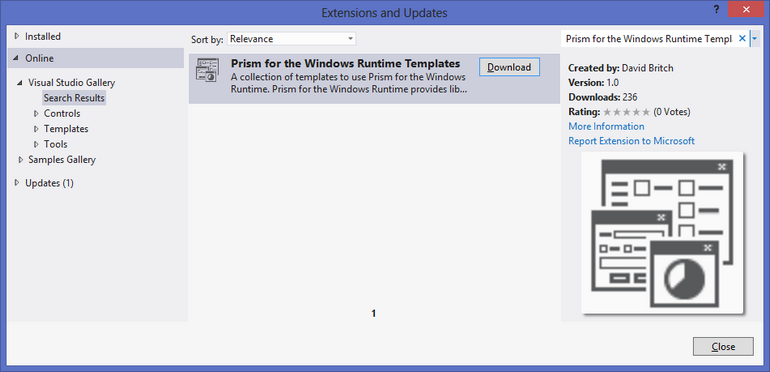
From Tools menu open “Extensions and Updates” dialog and search online for Prism for the Windows Runtime Templates, install it.

Extensions and Updates

New Project

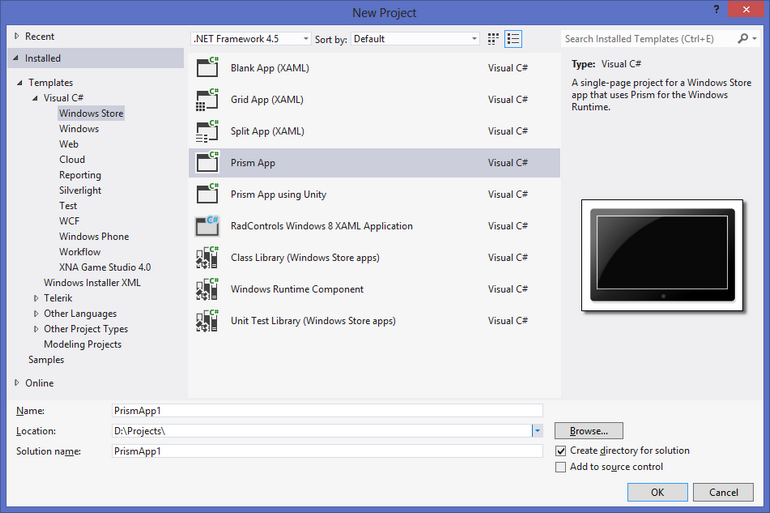
Installed extension adds two new project templates:

New Project

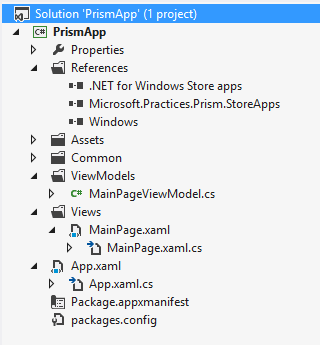
Select Prism App to create single-page Windows Store app configured to use Prism. It will include the following pieces:

Project

For simple app this is it. ViewModel implements INotifyPropertyChanged interface and is automatically wired with View using ViewModelLocator.AutoWireViewModel property:


<prism:VisualStateAwarePage
    x:Class="PrismApp.Views.MainPage"
    xmlns:prism="using:Microsoft.Practices.Prism.StoreApps"
    prism:ViewModelLocator.AutoWireViewModel="True"
    ... >
...
</prism:VisualStateAwarePage>

Therefore, you can start populating ViewModel with data and presenting it on View. For example


public class MainPageViewModel : ViewModel
{
    private string _title;
    public string Title
    {
        get { return _title; }
        set { SetProperty(ref _title, value); }
    }

    ...
}

However, not all Store apps are so simple and the following posts will demonstrate you more advanced features of Prism.

My DevTeach presentation slides

Last week I had the pleasure to present my “Deceptive simplicity of async and await” talk at DevTeach 2013. This year DevTeach celebrates 10th anniversary and I am proud to be part of this milestone.

Abstract: Understanding of asynchronous model is an essential knowledge for development of quality Windows Store apps. This session dives deep into implementation details of async and await C# keywords and provides information about common pitfalls and mistakes of async pattern use and the ways to avoid them.

Slides are available on SlideShare

Using Open Data in mobile apps: lessons learned

What is Open Data and why to use it?

Open Data is any information the government agencies and municipalities collect for their own needs but then offer for others to use. Open Data is usually available in machine-readable formats and can be used as it is or be a part of third party solutions, including commercial products.

By using Open Data or combining different sources of data, developers can enrich functionality of their mobile and Web applications. For example, food safety inspection results can be used by dinner planning app to provide better recommendation about restaurants to visit.

While all good practices for working with remote data sets are relevant for Open Data as well, there are some specifics, as I learned developing my Open Data apps for Windows Phone and Windows 8.

Importance of data caching

Cache for Open Data is not just a traffic saver for users on metered networks, but also a way to improve app’s usability. By displaying cached data first and downloading (and then presenting) most recent data asynchronously, startup time for app can be reduced significantly.

Most of Open Data sources have well defined update interval, for example daily, every Thursday, etc. Knowing these intervals, developers can tune cache lifetime to minimize unnecessary data requests.

To simplify building of network-optimized Windows 8/Windows Phone apps developers can use already existing libraries, like AgFX or Akavache.

Speaking of data caching and updating, an important point to remember is the modern app lifecycle. Mobile application can stay suspended for days and when app is resumed this is developer’s responsibility to update UI if new data is available.

Error handling

Most of the times, government and municipal Open Data services are quite reliable. However, if they are down and application is not able to retrieve new data, it should not result in application crash. Instead, application can use cache to display last available information and notify user about temporary unavailability of the service.

Application should indicate whether data is outdated and when it was retrieved.

Complex data sources

When application works with multiple data sources, custom Web or Cloud server can be used to merge or correlate data and expose it through simplified Web API. Same approach is useful when data is published in form of Excel or Word documents – parsing files on server and exposing data via HTTP.

Obviously, publishing of Excel files is the easiest approach for data owners, but it adds unnecessary complexity for data consumption by mobile apps. When necessary data is published as Excel spreadsheet only, developers should try to contact corresponding Open Data curators and request data in alternative formats.

Licensing

Open Data is free to use and usually licensed with just a few conditions. These conditions may vary from agency to agency bust the most common requirement is to acknowledge data source by providing some statement like “Contains public sector Datasets made available under the City of Toronto’s Open Data License”.

This statement presented in your app rises citizens’ awareness about Open Data initiatives and increases chances of publishing additional datasets, so make it visible!

Building Secure Windows Store Apps

Application security is a topic of continuous interest and attention. Modern applications are expected to be robust, predictable and respectful of users’ privacy. To help developers build safer Windows Store apps, several new security features have been added to Windows 8 and Visual Studio 2012.

However, while these new features reduce some security risks, it is important for developers to understand and follow the best practices for working with sensitive data and for intellectual property protection.

Read my post exploring the best security practices and new security features of Windows 8 on Canadian Developer Connection blog: http://blogs.msdn.com/b/cdndevs/archive/2013/03/19/building-secure-windows-store-apps.aspx

State of the Windows Store, February 2013

Number of the published apps

According to the number of individual app pages on apps.microsoft.com, about 42000 apps are currently listed (February 12) on the Store. Some of this apps are published just for selected markets and as a result the effective number of the apps available for the users may vary from country to country.

Number of apps fo various Windows Store markets

The following charts are based on the US market numbers.

App categories

Windows Store - app distribution per categories

While it was expected to see games and entertainment apps among the leaders of this chart, a large amount of educational apps is a surprise.

App price range

Windows Store - app price range

App quality

Windows Store - app quality

See also State of the Windows Store, December 2012

Deploying zipped data files with Windows 8 Store app

Some applications need to deploy databases or data files to user’s system. These files may be zipped to reduce package size and to improve speed of installation. For example, the following screenshot demonstrates Demo.zip archive added to Windows Store app:

Demo.zip

.NET Framework 4.5 provides native support for zip files with help of two new classes – ZipFile and ZipArchive, both located in System.IO.Compression namespace. ZipFile includes two convenient functions - CreateFromDirectory() and ExractToDirectory() and allows to create an archive or extract all files in one method call. ZipArchive methods are more verbose but provide more granular access to zipped files.

Unfortunately, ZipFile is not included in .NET profile for Windows Store, probably because of its synchronous nature, thus ZipArchive is the only class to handle zip files.

The following snippet demonstrates opening of deployed archive and extracting of files to app’s local data folder:


private async static Task<List<StorageFile>> UnZip()
{
   var files = new List();

   // open zip
   var zipFile = await Package.Current.InstalledLocation.GetFileAsync("Data.zip");
   using (var zipStream = await zipFile.OpenReadAsync())
   {
      using (var archive = new ZipArchive(zipStream.AsStream()))
      {
          // iterate through zipped objects
          foreach (var archiveEntry in archive.Entries)
          {
              using (var outStream = archiveEntry.Open())
              {
                 // unzip file to app's LocalFolder
                 var file = await ApplicationData.Current.LocalFolder.CreateFileAsync(archiveEntry.Name);
                 using (var inStream = await file.OpenStreamForWriteAsync())
                 {
                     await outStream.CopyToAsync(inStream);
                 }
                 files.Add(file);
              }
          }
      }
   }
    
   // return list of unzipped files
   return files;
}

This method works perfectly with flat archives, when all files are located in the root of .zip file. For non-flat archives, the method can be modified to detect folders by empty archiveEntry.Name property. Additionally, archiveEntry.FullName provides relative file path and helps to arrange files according to original archive structure.

Handling binding between WinRT Image control and ViewModel for local file system images

Image class provides a convenient way to display images from Internet


<Image Source="http://lunarfrog.com/myimage.png">

Also Source property accepts ms-appdata and ms-appx URIs, to display local data


<Image Source="ms-appx:///MyFile.png"/>

But for some reason file:// URIs do not supported and it is not possible to use Uri to display, for example, image located in Pictures Library. In this case application needs to load image files manually.

Example 1: loading image in code-behind

XAML


<Image x:Name="MyImage">

Code-behind


var file = await Windows.Storage.KnownFolders.PicturesLibrary.GetFileAsync("MyImage.png");
var fileStream = await file.OpenAsync(Windows.Storage.FileAccessMode.Read);
var img = new BitmapImage();
img.SetSource(fileStream);

MyImage.Source = img;

Example 2: loading image in ViewModel

XAML


<Image Source="{Binding ImgSource}"/>

ViewModel


public class MainPageViewModel : INotifyPropertyChanged
{
   private BitmapImage _imgSource;
   public BitmapImage ImgSource
   {
      get { return _imgSource; }
      set
      {
         _imgSource = value;
         OnPropertyChanged();
      }
   }

   private async void SetImage()
   {
      var file = await Windows.Storage.KnownFolders.PicturesLibrary.GetFileAsync("MyImage.png");
      var fileStream = await file.OpenAsync(Windows.Storage.FileAccessMode.Read);
      var img = new BitmapImage();
      img.SetSource(fileStream);

      ImgSource = img;
   }

   // …
}

Adapting UI of Windows 8 app for available pointer devices

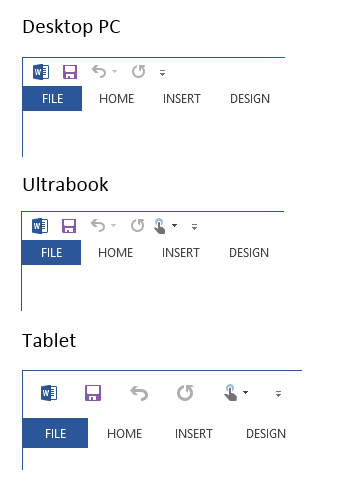
Below you can see screenshots of Microsoft Word 2013 main menu taken on three different systems: desktop PC, Ultrabook and tablet.

Word 2013

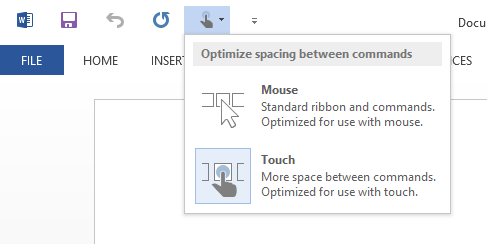
All three screenshots look different and here is why. Although Word 2013 is a desktop application, all Office 2013 applications are optimized for supporting touch-enabled systems. When Word detects that system is equipped with a touch device, such as tablet or Ultrabook touch screen, it displays additional button.

Word 2013

And even more, if no mouse is connected to a tablet, Word switches UI in touch-optimized mode. In contrast, Ultrabook has trackpad so Word stays in mouse-centric mode, allowing user to enable touch mode manually.

Usually Windows 8 Store apps do not require special logic for touch and mouse devices – they have to handle all pointer devices. But there are scenarios when apps can benefit from knowing about available devices. For example, an app may show simplified interface when tablet is used outside of office and full UI when mouse and keyboard are attached.

WinRT includes several classes that allow to identify attached input devices: TouchCapabilities, MouseCapabilities and KeyboardCapabilities


var mouseCapabilities = new Windows.Devices.Input.MouseCapabilities();
bool mousePresent = mouseCapabilities.MousePresent > 0;

var touchCapabilities = new Windows.Devices.Input.TouchCapabilities();
bool touchPresent = touchCapabilities.TouchPresent > 0;

By checking these properties apps can easily adapt user interface to maximize data input efficiency.

Next posts Previous posts