LibLog library, which I described before, uses reflection magic to allow libraries to do logging without introducing dependencies to any particular logging framework. Problem with the magic tricks is that they fail from time to time.

For me this happened when I tried to use ILMerge for Dropcraft CLI tool and merge in one executable all the Dropcraft libraries, which use LibLog, and Serilog. As the result, merged executable did not produce any logs. No exceptions, no warnings – just empty screen.

After a short LibLog code review, I found the root cause - Type.GetType() calls. LibLog uses GetType calls to probe availability of the different logging frameworks and it uses assembly qualified type names, like Type.GetType("NLog.LogManager, NLog").

Here the issue, in the ILMerged executable there is no NLog assembly. LibLog is not able to detect any logging framework and silently ignores all logging calls. Solution is easy - if GetType call for an assembly qualified type returns null, call GetType for the type only.

Type.GetType("NLog.LogManager, NLog") ?? Type.GetType("NLog.LogManager");

After the change, assembly perfectly works with and without merging. An example of the fully modified LibLog file is available in the Dropcraft repository.

Introducing Dropcraft, a NuGet-based app deployment and composition framework

NuGet ecosystem already overgrew the original idea of the NuGet as a design-time package management tool. NuGet powers installers, helps to create auto-updateable applications and pluggable solutions. What the ecosystem missed so far, is the general-purpose library which abstracts complex, not yet documented NuGet API and simplifies the NuGet-based solutions development.

Welcome Dropcraft. Based on the version 4 of NuGet, it provides a high-level package management API and enables various scenarios of using NuGet packages in the applications. Going beyond just package installations, updates and uninstallations, Dropcraft includes a runtime API for the installed packages discovering and a simple extensibility framework, which is based on NuGet packages.

The main features of Dropcraft

Scenarios, where Dropcraft may be useful

Get started

The easiest way to try Dropcraft is to use dropcraft.exe command line tool. It is built using public Dropcraft APIs and can be used as a framework usage example by itself.

dropcraft.exe install "bootstrap/3.0.0" --path "c:\DemoApp" -s "https://api.nuget.org/v3/index.json" --framework net461

This command instructs Dropcraft to install bootstrap v3.0.0 package from NuGet.org to c:\DemoApp\ folder. It automatically resolves all the dependencies, downloads the packages and installs them

Installing packages...
0 product package(s) found and 1 new package(s) requested
Versions are confirmed
2 package(s) are resolved
        2 package(s) to install
        0 package(s) to update
bootstrap/3.0.0 downloaded
jQuery/1.9.0 downloaded
bootstrap/3.0.0 installed
jQuery/1.9.0 installed
Installation complete.

As the result, C:\DemoApp contains Content, Scripts and fonts folder from the bootstrap and jQuery packages. Dropcraft followed the instructions and installed Bootstrap 3.0.0, which is pretty old. So, the following command will update it

dropcraft.exe install "bootstrap" --path "c:\DemoApp" -s "https://api.nuget.org/v3/index.json" --framework net461
Installing packages...
2 product package(s) found and 1 new package(s) requested
Versions are confirmed
2 package(s) are resolved
        0 package(s) to install
        2 package(s) to update
bootstrap/3.3.7 downloaded
jQuery/1.9.1 downloaded
bootstrap/3.0.0 uninstalled
jQuery/1.9.0 uninstalled
bootstrap/3.3.7 installed
jQuery/1.9.1 installed
Installation complete.

Dropcraft automatically resolved the latest version for the packages and upgraded them. Similarly, Dropcraft can install additional packages, downgrade or uninstall exiting ones.

Advanced scenarios

Previous example demonstrated used of the unmodified NuGet packages with Dropcraft. To enable more advanced scenarios, Dropcraft introduces an additional package manifest file, which can be included in the package by its author.

Package manifest allows to notify Dropcaft about package’s initialization method, allows packages to intercept various Dropcraft events and participate in the application composition.

Dropcraft defines a lightweight application composition model based on an extensibility point concept. Any package is able to define one or many extensibility points which will be linked with the corresponding extensions exported by other packages. It allows to create a chain of extensibility points/extensions and build application from packages like from the Lego blocks.

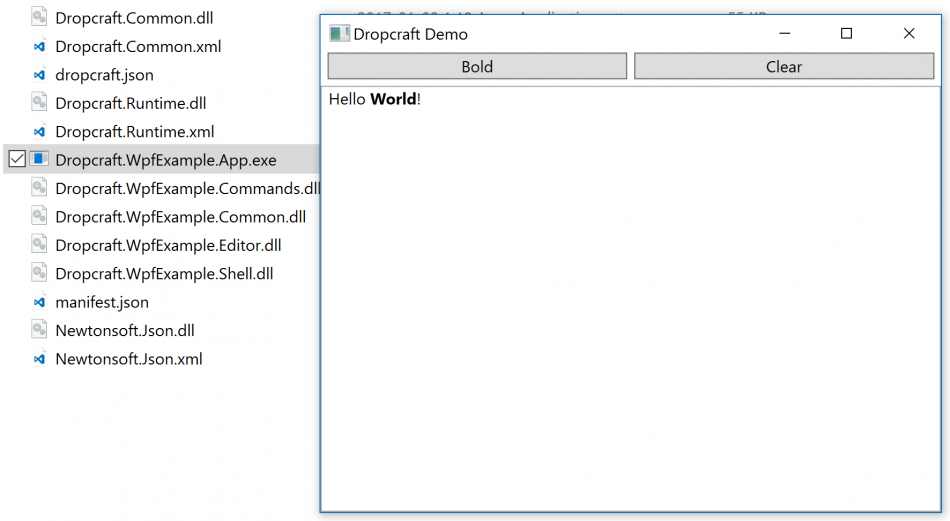
Dropcraft WPF demo app demonstrates this concept. It consists from the several NuGet package which can be installed separately or all together. First command installs a package with the common interfaces, an executable and the application’s main window. It uses two package sources – NuGet.org and MyGet.org

dropcraft.exe install "Dropcraft.WpfExample.App" "Dropcraft.WpfExample.Shell" "Dropcraft.WpfExample.Common" --path "c:\DemoWPF" -s "https://www.myget.org/F/dropcraft/api/v3/index.json" -s "https://api.nuget.org/v3/index.json" --framework net461

Dropcraft Demo App

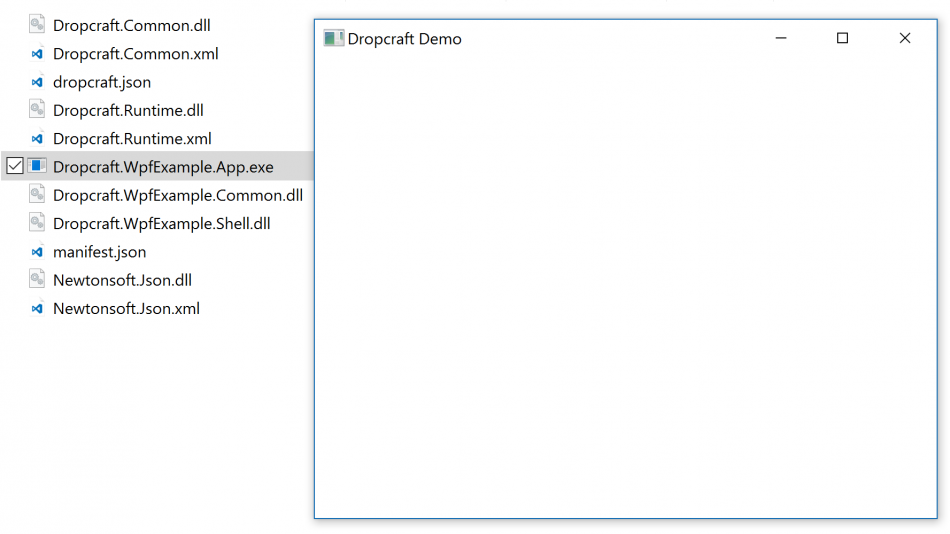
The resulting application is just an empty window. Next command adds some functionality by installing an extension – text editor.

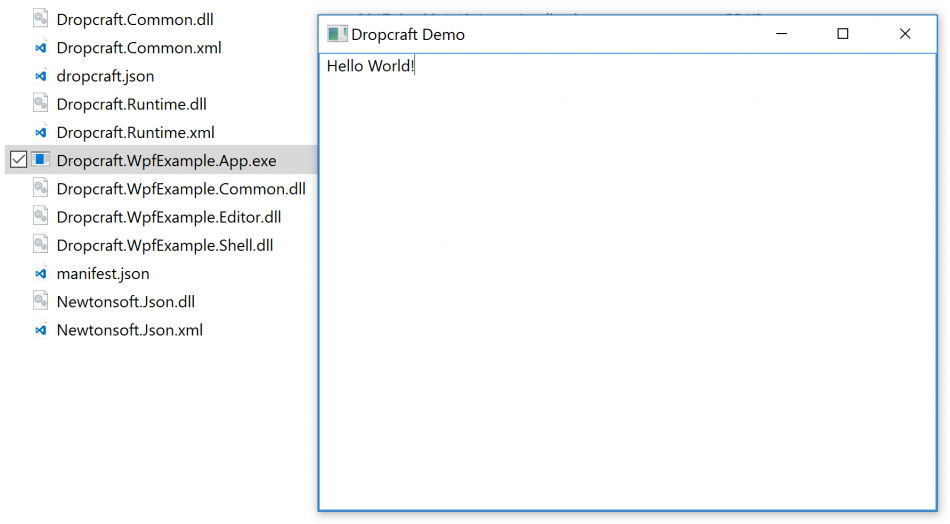
dropcraft.exe install "Dropcraft.WpfExample.Editor" --path "c:\DemoWPF" -s "https://www.myget.org/F/dropcraft/api/v3/index.json" -s "https://api.nuget.org/v3/index.json" --framework net461

Dropcraft Demo App

Text editor defines a new extensibility point – editor command – and there is Dropcraft.WpfExample.Commands package which exports two command. So the next step is to install it

dropcraft.exe install "Dropcraft.WpfExample.Commands" --path "c:\DemoWPF" -s "https://www.myget.org/F/dropcraft/api/v3/index.json" -s "https://api.nuget.org/v3/index.json" --framework net461

Dropcraft Demo App

The final result is the application composed from the packages where all the packages are loosely coupled through the interfaces and the composition is facilitated by Dropcraft. The framework takes care about the order of the packages initialization, runtime extensions registration and other scenarios common in the pluggable applications.

Conclusion

Dropcraft provides APIs which can be used by applications to incorporate NuGet functionality. It enables a wide range of scenarios, from direct manipulation with NuGet packages, to package-based plugins and runtime application composition.

While the release 0.2.1 is compiled for .NET 4.6.1, Dropcraft libraries target .NET Standard and are going to support .NET Core in the future releases. Similarly, future release will support ASP.NET Core in addition to the desktop applications.

How to use new features of MSBuild 15 with .NET Framework projects

One of the components updated for the Visual Studio 2017 release is the MSBuild build system. With the move of the .NET Core’s project system from project.json to the csproj format, MSBuild was updated to support the new lightweight csproj files. It also provides a better NuGet support, supporting referencing of the NuGet packages directly from csproj, and introducing restore and pack build tasks. This tasks can be used to restore project’s NuGet dependencies and to pack libraries without using NuGet, just with MSBuild.

While these features are primarily advertised (and work out of the box) for .NET Core projects, they can be used with .NET Framework 4.x projects too, assuming you have Visual Studio 2017 installed.

Restore

Restore task invocation is simple and is equivalent to the NuGet restore command

msbuild "path" /t:restore

If you will try to execute the command for an existing .NET Framework project with some NuGet packages referenced, it will do nothing. The exact message is “Nothing to do. None of the projects specified contain packages to restore”. MSBuild restore does not recognize packages.config. Instead, it expects to see all the NuGet references inside of the .csproj files.

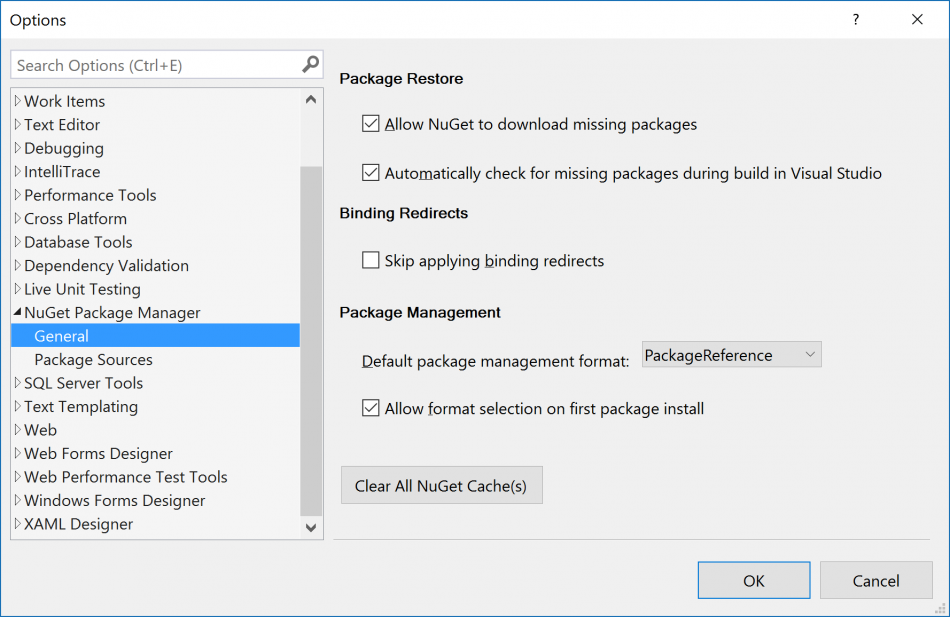
This feature can be enabled via the NuGet Package Manager options. You may need to remove and add again referenced packages to switch csproj to the new way of referencing packages.

NuGet options

As the result, the MSBuild should be able to perform the restore command successfully.

Pack

MSBuild pack command is the direct replacement for the NuGet pack. While MSBuild still supports .nuspec files, it can also build the package based on the project properties, or the command line parameters, without spec.

Similar to the restore command, pack does not work out of the box for .NET Framework projects. To support this command, some MSBuild tasks need to be imported in the project. It is done automatically for the .NET Core projects, but requires some modifications in csproj for the .NET Framework projects.

First change is to import NuGet related build tasks.

<Import Project="$(MSBuildSDKsPath)\NuGet.Build.Tasks.Pack\build\NuGet.Build.Tasks.Pack.targets" />

MSBuildSDKsPath variable points to C:\Program Files (x86)\Microsoft Visual Studio\2017\Enterprise\MSBuild\Sdks folder and is a part of the new MSBuild concept - SDK - which allows dynamically delivered build process extensions.

With this change, MSBuild is ready to do the pack. However, if you will try, it will complain about missing fields – ID and Authors. This fields can be defined using MSBuild properties or from the command line. For example, the command line may look like

msbuild /t:pack /p:PackageId=MSBuildTestLib /p:Authors="Andrei Marukovich"

And when defined in csproj

<PropertyGroup>
    <PackageId>MSBuildTestLib</PackageId>
    <Authors>Andrei Marukovich</Authors>
    <BuildOutputTargetFolder>lib\net461</BuildOutputTargetFolder>
</PropertyGroup>

BuildOutputTargetFolder is a property which should be used in this case to instruct MSBuild which framework folder to use for the build output. Without this line, the project assemblies will go in the root of .nupkg \lib folder. For the additional information about using the MSBuild properties for controlling the packing process and defining the package metadata, see Additions to the csproj format for .NET Core.

After these final changes, the modified .NET Framework project will allow to restore the packages and to be packed as a NuGet package using MSBuild, without involving NuGet.exe, and will continue to work in Visual Studio 2017.

Using the NuGet v3 libraries in your projects, part 2

The previous post demonstrated the use of RemoteDependencyWalker to discover all the dependencies of the target libraries. The provided sample will work as expected if versions for all requested packages are perfectly aligned. However, this is not a case in the real life. User’s request may require installation of the conflicting packages and the application should be able to recognize and handle this situation.

With the provided code, application will fail when any conflict will appear. For the problematic packages, meta information will not be resolved, and the resolve result for the associated GraphNode will be null.

The simplest approach to solve the conflicts is to use Analyze() method of GraphNode class. This method returns analysis result which contains information about the issues. There are three types of issues: cycle dependencies, version downgrades and versioning conflicts, and all of them are detected by GraphNode.Analyze().

While the cycle dependencies and versioning conflicts are most likely will lead to the application failure, version downgrades can be handled. Downgrade means presence of the required package with a version lower than a version of one of the resolved packages. In this situation, the dependency resolver adds both packages and marks package with the lower version as a downgraded package. It can be used by the application to decide next action: allow downgrade or fail.

Using the NuGet v3 libraries in your projects

NuGet 3 tool, as it is expected from a package manager, by itself built using packages. These packages are published on the NuGet.org gallery and can be used by any applications required NuGet-like features. Usage scenarios include plugins, packaged as .nupkg, application content, package-based installers and others. Several projects, like Chocolatey or Wyam, already integrate NuGet for the different proposes, however for the really wide adoption of the NuGet libraries, a better API documentation is required.

This post demonstrates one of the ways of incorporating the NuGet libraries in an application. Dave Glick, an author of Wyam’s, has a great introduction to NuGet v3 APIs and I recommend to read his posts before continuing, however it is not required. The NuGet usage approach described in this post is different from the approach reviewed in the mentioned articles. When applied, it allows to create .NET Standard compatible libraries and incorporate the NuGet tooling not only in .NET Framework applications, but also in .NET Core solutions.

NuGet 3 uses a zillion of libraries. Unlike NuGet 2, composed from just a few libraries, NuGet 3 design is based on multiple small libraries. For example, the post’s sample code uses nine libraries. Another note about the API – it is still in development. Post is based on version 3.5.0-rc1-final of NuGet and before the release some APIs may change.

Top level NuGet libraries used by the solutions are NuGet.DependencyResolver and NuGet.Protocol.Core.v3.

Workflow

The logical workflow is similar to NuGet restore command and from the developer perspective it includes the following phases:

Main concepts

Prepare package sources

The following code adds the official NuGet feed as the package source and registers the sources in the RemoteDependencyWalker’s context.

var resourceProviders = new List>();
resourceProviders.AddRange(Repository.Provider.GetCoreV3());
 
var repositories = new List
{
    new SourceRepository(new PackageSource("https://api.nuget.org/v3/index.json"), resourceProviders)
};
 
var cache = new SourceCacheContext();
var walkerContext = new RemoteWalkContext();
 
foreach (var sourceRepository in repositories)
{
    var provider = new SourceRepositoryDependencyProvider(sourceRepository, _logger, cache, true);
    walkerContext.RemoteLibraryProviders.Add(provider);
}

Identify a list of packages to install

RemoteDependencyWalker accepts only one root library to calculate the dependencies. In case of the multiple root target libraries, they should be wrapped inside of a fake library and IProjectDependencyProvider allows to include the fake library in the dependency resolution process.

IProjectDependencyProvider defines SupportsType method, which allows to control library types handled by the class and GetLibrary method which is expected to return the library object.

The trick is to define the fake library as a LibraryDependencyTarget.Project and only accept this type of libraries to be resolved by ProjectDependencyProvider. So, when RemoteDependencyWalker will ask for the instance of the fake library, it can be constructed with the list of targeted libraries as dependencies. For example, the following code assumes that two NuGet libs are the targeted libraries to install.

public Library GetLibrary(LibraryRange libraryRange, NuGetFramework targetFramework, string rootPath)
{
    var dependencies = new List();
 
    dependencies.AddRange( new []
    {
        new LibraryDependency
        {
            LibraryRange = new LibraryRange("NuGet.Protocol.Core.v3", VersionRange.Parse("3.0.0"), LibraryDependencyTarget.Package)
        },
        new LibraryDependency
        {
            LibraryRange = new LibraryRange("NuGet.DependencyResolver", VersionRange.Parse("3.0.0"), LibraryDependencyTarget.Package)
        },
    });
 
    return new Library
    {
        LibraryRange = libraryRange,
        Identity = new LibraryIdentity
        {
            Name = libraryRange.Name,
            Version = NuGetVersion.Parse("1.0.0"),
            Type = LibraryType.Project,
        },
        Dependencies = dependencies,
        Resolved = true
    };
}

Dependency discovery

When all preparations are done, RemoteDependencyWalker can start to discover the dependencies

walkerContext.ProjectLibraryProviders.Add(new ProjectLibraryProvider());

var fakeLib = new LibraryRange("FakeLib", VersionRange.Parse("1.0.0"), LibraryDependencyTarget.Project);
var frameworkVersion = FrameworkConstants.CommonFrameworks.Net461;
var walker = new RemoteDependencyWalker(walkerContext);
 
GraphNode result = await walker.WalkAsync(
    fakeLib,
    frameworkVersion,
    frameworkVersion.GetShortFolderName(), RuntimeGraph.Empty, true);
 
foreach (var node in result.InnerNodes)
{
    await InstallPackageDependencies(node);
}

The provided code does more than the dependencies discovery. It defines the supported .NET framework version and it iterates through the result to install the packages.

Installing the packages

And now application is ready to install the discovered packages

HashSet _installedPackages = new HashSet();
 
private async Task InstallPackageDependencies(GraphNode node)
{
    foreach (var innerNode in node.InnerNodes)
    {
        if (!_installedPackages.Contains(innerNode.Key))
        {
            _installedPackages.Add(innerNode.Key);
            await InstallPackage(innerNode.Item.Data.Match);
        }
 
        await InstallPackageDependencies(innerNode);
    }
}
 
private async Task InstallPackage(RemoteMatch match)
{
    var packageIdentity = new PackageIdentity(match.Library.Name, match.Library.Version);
 
    var versionFolderPathContext = new VersionFolderPathContext(
        packageIdentity,
        @"D:\Temp\MyApp\",
        _logger,
        PackageSaveMode.Defaultv3,
        XmlDocFileSaveMode.None);
 
    await PackageExtractor.InstallFromSourceAsync(
        stream => match.Provider.CopyToAsync(
            match.Library,
            stream,
            CancellationToken.None),
        versionFolderPathContext,
        CancellationToken.None);
}

As the result of execution, all resolved packages will be de-duplicated and installed in D:\Temp\MyApp[package-name] subfolder. Each package subfolder includes .nupkg, .nuspec and libraries for all supported frameworks.

And that’s it. The provided code demonstrates the whole workflow. There are tons of small details hidden behind this simple demo, but it should be enough for staring your own experiments. Fill free to comment if you have any questions.
How to improve pattern matching and deconstruction in C#

In the previous post I mentioned that C# pattern matching is far from complete. In particular, close coupling between matching and deconstruction is not present so far in C#. The maximum what can be achieved using deconstruction is extraction of values from complex types:

(var name, var color, _) = new Cat();

Underscore here represents a value to discard, similar to out variables. However, what I would really like to see from the pattern matching is the following:

if (x is Cat (var name, var color, _)) { }

to match x as Cat and deconstruct it to extract name and color. Or

if (x is Cat (var name, var color, 2)) { } 

to match x as two years old Cat, and extract the rest if it is true. Or may be

If (GetCat() is (_, var color, 3)) { }

to match and deconstruct the Cat object returned by GetCat()

All these constructs bring together pattern matching, tuples and deconstruction and allow to develop even more condensed code.

C# 7.0 bits: pattern matching

Another interesting set of features introduced in C# 7.0 is related to patter matching. Pattern matching is a well-known concept in functional programming languages and in a nutshell, it allows to test data against some “pattern” (for example test if data belongs to some type) and to extract values from complex data (deconstruct). In many cases pattern matching allows to replace a series of if, else and assignment statements with a single expression.

To support pattern matching, C# 7.0 extends use of is and case keywords and allows to use constants and types as the patterns. The simple use of the pattern matching is to match a value against some constant:

public void UltimateQuestion(object x)
{
   if (x is 42)
   {
      Console.WriteLine("This is the answer");
   }
}

More interesting use is to test for the type and to create a new variable of that type

public void UltimateQuestion(object x)
{
   if (x is null)
      return;

   if (!(x is int i))
      return;

   Console.WriteLine(i < 42 ? "Ask one more time" : "42 is the answer");
}

Similarly, patterns can be matched using switch statement:

switch (animal)
{
   case Dog d:
      break;
   case Cat c when c.Color == "White":
      break;
   case null:
      Console.WriteLine("No animal");
      break;
   default:
      Console.WriteLine("Unknown animal");
      break;
}

Notes

Unlike Haskel or Elixir where pattern matching is engraved into the language, C# implementation of pattern matching does not feel at the moment fully integrated with the language. It could be because of the limited number of patterns available to use or a loos link between pattern matching and deconstruction, but anyway it is a promising start which requires some improvements in the next releases.

C# 7.0 bits: out variables

Release of Visual Studio 2017 not only introduced new productivity tools and improvements for the code editing experience, but also brought new version of C#.

Similar to the previous release – C# 6.0 – new release is not focused on a single flagship feature and introducing several smaller features. One of the most exiting of these features (at least for me) is out variables. Initially this feature was planned for 6.0 release but was cut shortly before the release.

Code which is similar to the following snipped is extremely common in all types of C# application:

public string ReformatDouble(string val)
{
   double x;

   if (double.TryParse(val, out x))
   {
      return $"{x:F4}";
   }

   return $"{x}";
}

Sometime out variable is not even needed, because the single propose of the code could be testing parsing of the value:

public bool IsDouble(string val)
{
   double x;
   return double.TryParse(val, out x);
}

With the new “out variable” feature this code can be significantly simplified:

public string ReformatDouble(string val)
{
   if (double.TryParse(val, out var x))
   {
      return $"{x:F4}";
   }

   return $"{x}";
}

One interesting point here is the scope of the variable. Unlike variable i defined in the following loop for (var i = 0; i < 10; i++) {}, x continues to exist even outside of if (…) {} construct.

When out variable is not needed, code can be simplified even more - variable can be discarded:

public bool IsDouble(string val)
{
   return double.TryParse(val, out _);
}

Happy parsing!

First impressions from using .NET Core for AWS Lambdas and deployment tips

Earlier this year, Amazon announced availability of C# as a first-class citizen for AWS Lambda services. This solution is based on .NET Core and allows to use .Net ecosystem for building serverless services.

Tooling

Tooling and integration with Visual Studio are surprisingly good. VS2017 support is in preview, but even the preview extension is pretty stable. C#-based Lambdas can be deployed and tested directly from Visual Studio, with a couple of clicks. Lambda tools can also be used from .NET Core CLI, which enables command line-based Continuous Integration and Continuous Deployment scenarios.

Deployment

C# Lambdas support two main workflows – simple Lambda Function and serverless application hosted by Lambda. While the first case is simple, the serverless model is more interesting as it allows to host the whole ASP.NET Core Web API site in Lambda. In this case, AWS tools, with help of CloudFormation, deploys and configures API Gateway endpoint and Lambda which routes all requests to the corresponding Web API controllers/actions. In the same time, Web API site can still be run locally for testing purposes. This model provides a huge productivity boost comparing with a traditional model when Lambda shall be deployed to AWS first and only then can be tested.

AWS Developer blog provides tutorials on creating a new C# Lambda or converting existing ASP.NET Web API site in Serverless application. While the tutorials are well written, they miss a couple of important points:

Performance

Performance of the solution is yet to be profiled, but the quick measurements show performance enough to proceed with the spikes. Latency for the cold Lambda (which is almost not relevant as you may use some techniques to keep Lambdas warm) is about 5s for the “Hello World” type of API and the average latency for the warm Lambdas is about 80ms.

Xamarin experience event

If you are interested in Xamarin technologies, Xamarin team is going to be in Toronto to speak about the new features delivered as part of Visual Studio 2017 release, cloud connectivity for the mobile apps and the mobile DevOps story. You will also have a chance to participate in a panel discussion and ask your questions.

The event will take place on Thursday, April 13th at Microsoft Toronto Office (suite 1201, 222 Bay Street) from 10am to 1pm, lunch provided.

For registration, email Catherine Kerr with your name and contact details. Spaces are limited.

Agenda

Next posts Previous posts